Hello friends, here are a few printable planner tips that I learned through the years. I have been printing my free printable planner for 4 years and my planner stickers for 2 years now. Every month I’m excited to share with you what I will use and I’m so happy to know that you enjoy our printables too. I also listed down planner supplies that I regularly use. I hope these printable planner tips help answer some of your questions.
By the way, the ads on our blog help support us so we can keep giving you free printables as well as affiliate links. Through these, you also help support us at no extra cost to you. Thanks for being here!
Printable planner tips
1. Be ready to make mistakes.
This is the first of my planner tips for you. I have made so many mistakes when printing my planner and stickers, and that’s okay. What is important is that we keep trying. Some mistakes are forgivable and I can still use the pages that I printed. One time I had no choice but to throw an entire booklet.
Have some cheaper paper or scratch paper and make some trial prints if you are not sure about your printer settings.
2. Find your best paper for printing.
I have tried so many kinds of paper that are available in our local stores. For me, smooth white paper is best for writing as it is so hard to write on textured paper. I now use 100 gsm A4 size paper to avoid ink bleed or ghosting. I cut the A4 paper in half to make A5 pages. The disadvantage with smooth paper is that black printed ink tends to smudge on the pages. You can blot it out using masking tape or wash tape to avoid ink smudges.
For my planner stickers, I mostly use regular matte white sticker paper because glossy textures reflect light and hurt my eyes. However glossy or satin sticker papers show colors better so I still use them for some smaller stickers. It is also easier to write on matte sticker paper using any pen.
You also need to figure out what binder system works for you. I currently use a slim refillable notebook to hold my current monthly planner. Then I transfer the previous monthlies to a thicker A5 binder. This system makes it easy for me to insert pages and I don’t have to carry the previous monthlies when I bring my planner with me.
There are links to planner products below to give you an idea of the materials I mentioned here.
3. Know your printer and figure out the right printer settings.
Printers can be very expensive, so I suggest using your current printer instead of buying a new one. Since I didn’t have a printer, I bought the cheapest color inkjet printer I could find and it has brought so much happiness to me since then.
The downside is my printer does not print borderless unlike more expensive printers. I always set all my paper margins to zero to print on as much area as possible. You can do this when you go to Page setup… before printing. The print preview will show you if you have removed all margins.
Another important thing is to go to Printer… then Presets and choose Color-Fine to give the best print quality. However there are times when I only printed the draft and I was still happy with the result.
If you are printing our planner stickers – Go to Size and always choose Actual size. This will ensure that your sticker boxes are 3.8 cm or 1.5 inches wide.
Some printers have presets for different kinds of paper so you’ll have to look into that as well.
4. Use a PDF editor to rearrange your planner pages.
There are a lot of PDF editors out there that you may use. My favorite right now is the free PDF Editor on Canva. You can use this when you have a Canva account (Pro or free). Upload the PDF to Canva and use its many features to customize your planner. Add or delete pages, duplicate them, or even copy and paste from a different document. You can even add texts and images or insert your own photos.
Click here to read my tutorial on how to organize PDF pages using Canva

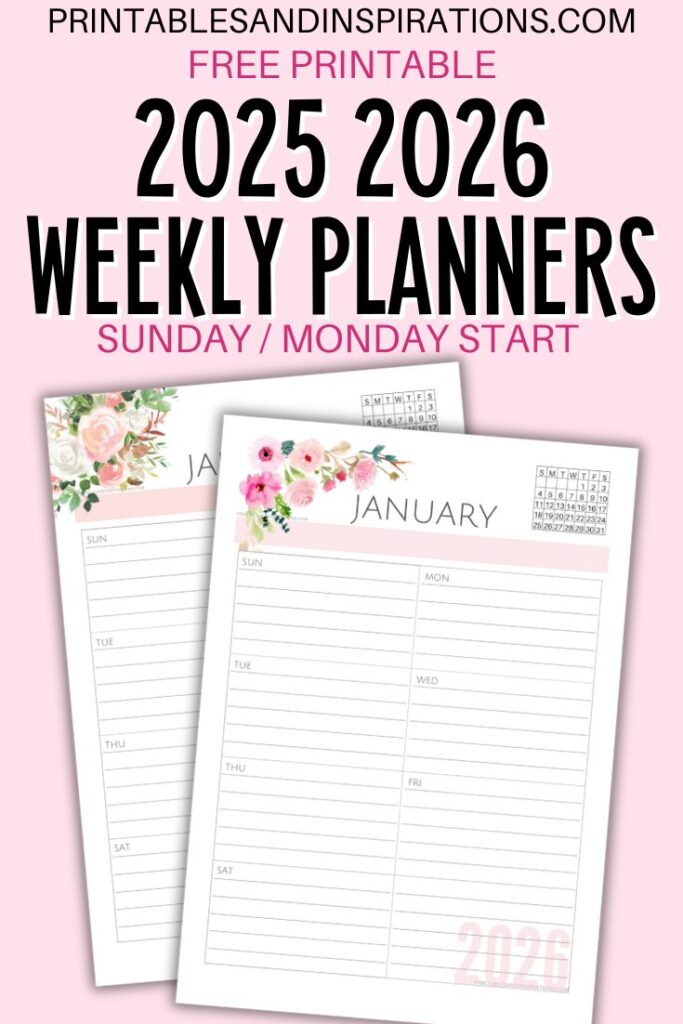
5. Print your A5 planner as a booklet.
I like the A5 size planner and the easiest way to print my planner is to print as a booklet on A4 size paper. You may do this when you download the dated monthly planners we give away for free. Choose Booklet when you print and make sure that Binding > Left.
It is very important to set your paper margins to zero to print the right size. Set your paper margins to zero then print the back side only. Feed the printed pages back to the printer then print the front side only. (You may also print the front side first, then the back side next.)
Here’s an old video to show you how I printed my booklet. I used to staple the pages at the center to make a small book as shown in the end. You may also check this blog on how I print my A5 planners.
6. Try things out then do your own thing.
I have watched hundreds of planner videos and I really admire how people are so creative with their planners. At first I tried doodling and calligraphy but I was never really happy with what I made. So I designed pages on Canva and printed them, and they are so much prettier.
I also realized what my thing is – planner stickers! I love using stickers and washi tape on my pages, it feels like having my own sticker book. Now I make my own planner stickers and share them with you. It got even more fun when my husband got me a cutting machine! Writing on my planner becomes more enjoyable when I use a lot of tape and stickers.
That’s all the printable planner tips I can share for now and I hope these were helpful. I wish you also find your thing if you haven’t yet and I hope that our printables help you in your journey. Some have shared that printing our pages take away the pressure of creating a pretty bullet journal every month. I am just thankful that I can use my creativity and share my work with you. 🙂
Printable planner essential supplies
Here are the tools that I use to assemble my DIY A5 planner plus a few more planner tips. You may click the links to see similar products from Amazon. (Affiliate links here.)
Disclaimer: My personal supplies were bought from local physical stores and not from Amazon. It is better to try working with tools that are already available to you before making any new purchase.
A5 refillable notebook or A5 binder (You may also use A4 binder if you want bigger pages)
Paper cutter (for cutting A4 paper in half to make A5 pages)
Puncher (should match the rings on your binder)
Corner rounder (rounded corners always look neater)
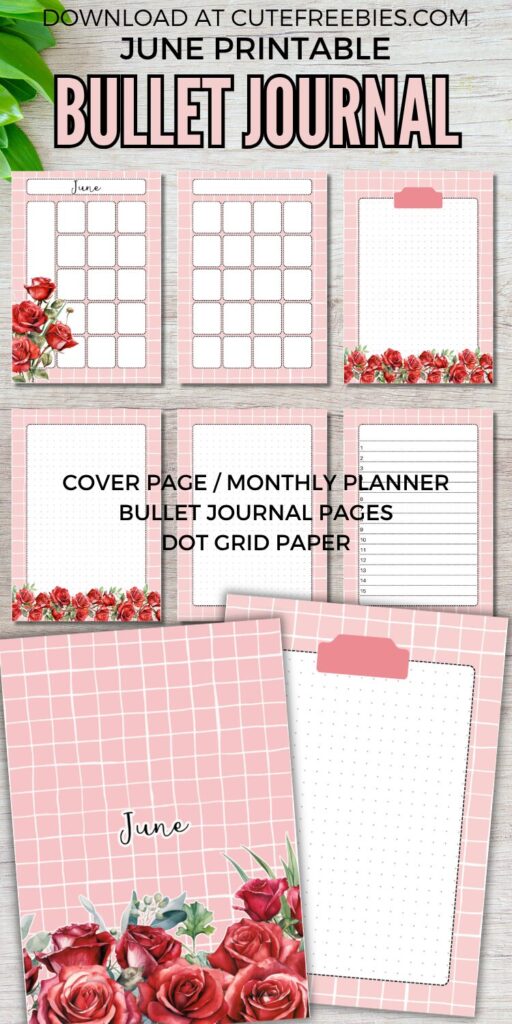
Here’s a quick video to show how I print and put together my monthly bullet journal using free printable pages from this blog.
CLICK HERE TO SEE MORE FREE PLANNER TEMPLATES / THEMES
Want to use our free printable planner stickers? Here are more tools that I use.
A4 size sticker paper (regular matte)
curved tweezers (helps me place stickers on my pages)
craft knife and metal ruler (never use plastic rulers)
SILHOUETTE CUTTING MACHINE (I use the Silhouette Portrait 3 for my personal use)
DOWNLOAD MY PLANNER STICKERS FOR 2022
Write on your planner and add more color! These are the materials that I currently use.
Tombow Fudenosuke brush pen (hard tip)